Welcome to Video Tutorials

Welcome to video tutorials, a place which main purpose is to help people who are interested in graphic design, photography, Macromedia Flash animation... Here can be found many tutorials on these subjects showing you how, in easy way, you can create what you want and have a really nice results. There are new tutorials added every day! Hope we are useful to at least some of you because that is our main goal! --------------------------------------------------------------------------------------------------------------------------------------------------

Saturday, March 13, 2010

Spear Sphere Tutorial

In this tutorial you will make this transformation:


Ok lets start,

first you have to find similar texture image like first one. i used some "stone road" photo

than using Eliptical Marque Tool make selection like this and choose Layer via copy (using right click on selection)


than invert image colors (Image > Adjustments > Invert) and you should get this


using Magic Wand select square and than use Spherize filter (Filter > Distort > Spherize)


we're using another filter (Filter > Distort > Polar Coordinates) select polar to Rectangular


Rotate image cnavas 90CW and use wind filter (Filter > Stylize > Wind). Repeat wind filter step 3 times


now we sholud bring sphere back with rotating image back 90CCW and Polar Coordinates filter (Filter > Distort > Polar Coordinates). this time will be Rectangular to Polar


one last step Ink filter (Filter > Brush Strokes > Ink Outlines) and this is it


now you can play with color and bacground and get something like this or whatever ypu like

Saturday, May 5, 2007

--Photoshop-- Create Water Drops

Tutorial on creating water drops in adobe photoshop in a few easy steps.


1. Open your image on which you want to create water drops (mine was a picture of leaf).


2. Create new layer, select Elliptical Marquee tool and create ellipse like this:


3. Now select Gradient Tool (make sure that background/foreground color is black/white) and cerate gradient as it little red arrow shows:


4. Deselect and now set the blending mode from normal to overlay:


and now you should have something like this:


5. Now double click on the "water drop" layer to go to set shadows in blending options:


After this you have created a realistic water drop:


Optional you can duplicate "water drop" layer a few times and using Transform Tool you can easy get this:

Wednesday, May 2, 2007

--Photoshop-- Stick Out From Picture

This time you will learn how can you make any object stick out form any image like this:


1. Open your image, duplicate layer (delete first one) and make new layer. You should have this in layer palette:


2. Now select Rectangular Marquee Tool, make selection on "superman layer" and fill it with white like this:


3. Select Rectangular Marquee Tool again, make square on the white area and use Erase Tool to bring back the old photo:


4. Select first selection with rectangular again and press Ctrl+T to transform it. Right click on transform area to select Perspective. Transform selection like this:


5. Use Erase Tool to remove part of border that should not be seen:


6. Now select "Background copy" layer and using erase tool remove all all background of image except that in border (it is easier to zoom image and use erase tool):


7. Create another new layer (for background) and drag it below background layer like this:


8. select "Back" layer and fill it with some color (no matter which one):


9. Now double click on "back" layer to open Blending Options and in Gradient Overlay set this:


It is done! Your final result will be:

Tuesday, May 1, 2007

--Flash-- Quick Stickman Animation

This tutorial will show you how can you animate a stickman in macromedia flash.


--Flash-- Business Site Intro part2

.


12. Now we have to create title. Insert new layer. On 120th frame create last position of title using text tool and convert it to movie clip:


13. Copy 120th frame of "title layer" and paste it to 46th frame. Move title to where you want to be its first position and set Alpha to 10%:


14. Click somewhere between 46th and 120th frame, create motion tween and also set Ease to +100:


15. Now repeat steps 8-11 to create animated line under the title. After that you should have something like this:

click to enlarge

click to enlarge


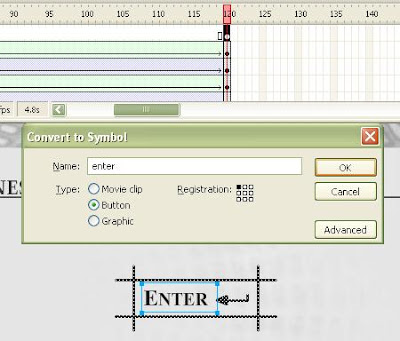
16. Now insert new layer for "enter" button. On 120th frame create button and convert it to button:


17. Copy 120th frame of "enter layer" and paste it to 80th frame. On 80th frame set alpha to 0%:


18. Click somewhere between 80th and 120th frame and create motion tween with Ease -100:


19. Insert another layer for actions. On 120th frame insert blank Keyframe and in actionscript (press F9) write: stop();


20. If you want to add some loop music to your intro go back to root, insert new layer for music and add sound on it just like this:


That's it! Your Flash site intro is ready to go!


You can download finished .fla file here:
Flash Intro (fla file)


You can see Flash site intro here:
Flash Site Intro