Welcome to Video Tutorials

Welcome to video tutorials, a place which main purpose is to help people who are interested in graphic design, photography, Macromedia Flash animation... Here can be found many tutorials on these subjects showing you how, in easy way, you can create what you want and have a really nice results. There are new tutorials added every day! Hope we are useful to at least some of you because that is our main goal! --------------------------------------------------------------------------------------------------------------------------------------------------

Saturday, April 28, 2007

--Photoshop-- Magma Planet

Create realistic magma planet in adobe photoshop.


1. Open up your "space image", make new layer and draw a circle with Ecliptical Marquee Tool (hold Shift):


2. Fill circle with black Edit>Fill and apply difference clouds filter to it (Filter>Render>Difference Clouds). Apply filter twice:


3. Now go Image>Adjustments>Levels and set:


4. Next step will be Filter>Sharpen>Unsharp Mask with these settings:


after which you have this:


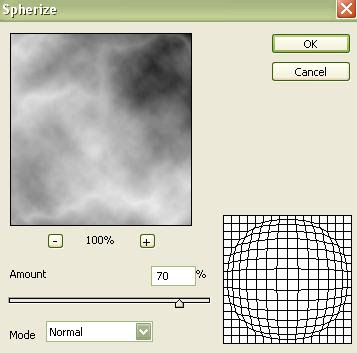
5. Now go Filter>Distort>Spherize and set:


which gives this:


6. Now we gonna set proper color. Image>Adjustments>Color Balance and for Shadows, Midtones and Highlights set:

Shadows:


Midtones:


Highlights:


and now you have something like this:


7. Now just use transform (Ctrl+T) and a little bit of Blur Tool for edges od planet and you have your final result:

--Flash-- Animated Super Mario

A brief tutorial about making an animated sprite character in Macromedia Flash


Macromedia Flash

Friday, April 27, 2007

--Macromedia Flash-- iPod Flash Site

This is tutorial on how to make a simple Flash site with iPod interface.

1. Open new flash document, set dimensions based on your image, set frame rate to 25 and import your iPod image (Ctrl+R):


2. Lock layer with background image and make new layer for links (buttons):


3. Use text tool to create links on new layer:


4. Now convert links to buttons (select every link separately and pres F8 to convert it):


5. Now select Rectangle Tool and draw shape over iPod's display. Select it and press F8 to convert to Movie Clip:


6. Also set Instance Name: display


7. Set Alpha: 60% for display


8. Now double click on display to enter it's stage and move first frame to right form 1st to 2nd frame (drag it) just like this:


9. Now select first frame and in actionscript write code: stop();


10. Select 26th frame (left click on it) and press F6 to expand timeline to 26th frame with same keyframe as 2nd one:


11. Select 2nd frame and transform display like this:


12. Now set display's Alpha to 0% on 2nd frame:


Next Page ---> iPod Flash Site part2

.

--Macromedia Flash-- iPod Flash Site part2

.


13. Now create Shape Tween:


14. Insert new layer for content and on 26th frame (last one) of new layer add content that will appear when someone click on link 1 (in our case "About iPod" link):


15. Insert one more layer that will be used for actions and on first frame enter its name: "l1"


16. Now drag it form 1st to 2nd frame:


17. Select 26th frame (last one) on last layer, insert keyframe and in actionscript write code: stop();


18. Now select all frames on stage from 2nd to 26th and copy frames:


19. Than select 27th frame for all 3 layers and paste frames:


20. Change name "l1" to "l2":


21. Also replace content for l2 (link 2) on last frame in 2nd layer:


22. Repeat steps from 18 to 21 for the other two links.


23. Go back to root, select link 1 (About iPod) and in action script write this code:

on (release){
_root.display.gotoAndPlay("l1");
}


24. Do the same thing for other 3 links except "l1" for link 2 will be "l2":


on (release){
_root.display.gotoAndPlay("l2");
}


For link 3 it will be "l3"... (you got the point)


Thats it! Flash site is finished!


You can see finished flash site by clicking on link below:

iPod Flash Site

You can download finished .fla file here:

Download .fla file


If you have any questions about this tutorial contact me: chilefirst@gmail.com

Monday, April 23, 2007

V-Ray Usage

VRay render usage. This will show you how to model a glass using V-Ray in 3ds Max. You need a VRay plug in to do this.


V-Ray

tanks to ~dragun [ www.ievolution.com.br ]

Sunday, April 22, 2007

Pencil Drawing

Extremely easy and "good resulting" tutorial on how to make a perfect sketch from any image.

1. Open your image


2. Desaturate it, Image>Adjustments>Desaturate:


3. Duplicate layer (Layer>Duplicate Layer) and invert colors Image>Adjustments>Invert:


4. Now in layer palette select Color Dodge:

and now yu should have this (don't worry it will be ok):


5. Now go Filter>Blur>Gaussian Blur and set Radius to 9 pixels:


and that's it. You're done! Your final result:


Friday, April 20, 2007

--Photoshop-- Cartoonize Photo

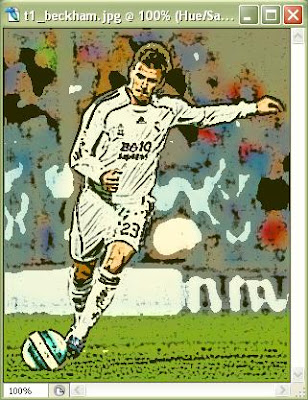
There are only few steps needed to make cartoon effect from any photo.

Before:


After:


1. Open your photo and go Filter>Artistic>Poster Edges and set:


2. Now click on "create new fill or adjustment layer" on the bottom of layer palette

click on Hue/Saturation and set:


Now you have this:


You can see that colors are not adequate to cartoon colors so we have to adjust them...

3. Go Layer>Layer Style>Blending Options and set:


and now we have our final result:


Enjoy!